
Building Flutterbat. . . Or any of my 3d masks really…
The number one question I got when i debuted Flutterbat was where did I get the costume. Well I built it along with Flora Hill who did all the wonderful 3d sculpting / art work. I also drew from resources on DeviantArt, a big thanks out to Masemj for the cutie marks, and Floralisole for a great set of eyes!
The next question was how … I promised a build post so here it is…
Here is a really abbreviated version of how I go about the creative process of making a cosplay.
Note I don’t have pictures of all the steps below, so many of the pictures of the steps will be from other builds !
Contents
- Ideas / pre-research
- Get help !
- Make it 3d printable
- Print the parts
- Assembly
- Interior mounts / test fitting
- Smoothing and surface prep for painting
- Painting
- Eyes
- Interior mounts part 2
- Hair
- *Everything else* / List of purchased items with links !
Step one – Ideas and a bit of pre-research …
For me starts with an idea for either character I want to do, or more often for me it comes from a look or an outfit (or shoes lol) I would like to wear and then I work backwards to find a character that would make sense to wear it. My best example of working backwards like that was my Cheerilee, I really wanted to do a Cheerleader, and when they put her in the outfit on the show I was like boom!
On Flutterbat, it was kind of round about. I really like Fluttershy(best pony!) and I have wanted to do a cosplay of her for a long while, but I really couldn’t find an outfit to put her in that I liked.
Flutterbat seemed like the natural choice by going goth vampire. Fluttershy has done the goth thing as well as the vampire thing so it all really comes together and works.
It was fun how it all came from an idea into reality… this was the real start to the costume. Flora Hill and I were chatting on facebook were chatting, I mentioned I would like to do a Flutterbat someday, she thought it was a cool idea and before you know it she sent me a sketch, and a 3d model… (Flora is wicked good with art stuff !)
With that I keep working on it, talking about it, until I hash out the overall look, the clothes, shoes, all of it, keeping in mind what I think would fit me and look ok.
I then research if I can buy or build the needed clothing items before i even consider moving forward. If I cannot figure all that out in advance I really don’t move forward on the build.
For Flutterbat’s main outfit item. Her dress, I did what I normally do, I went on eBay an located an overseas seller that makes dresses custom to fit based on measurements. Then hunted around amazon and elsewhere for everything else, boots, fishnets, gloves, necklace, etc…
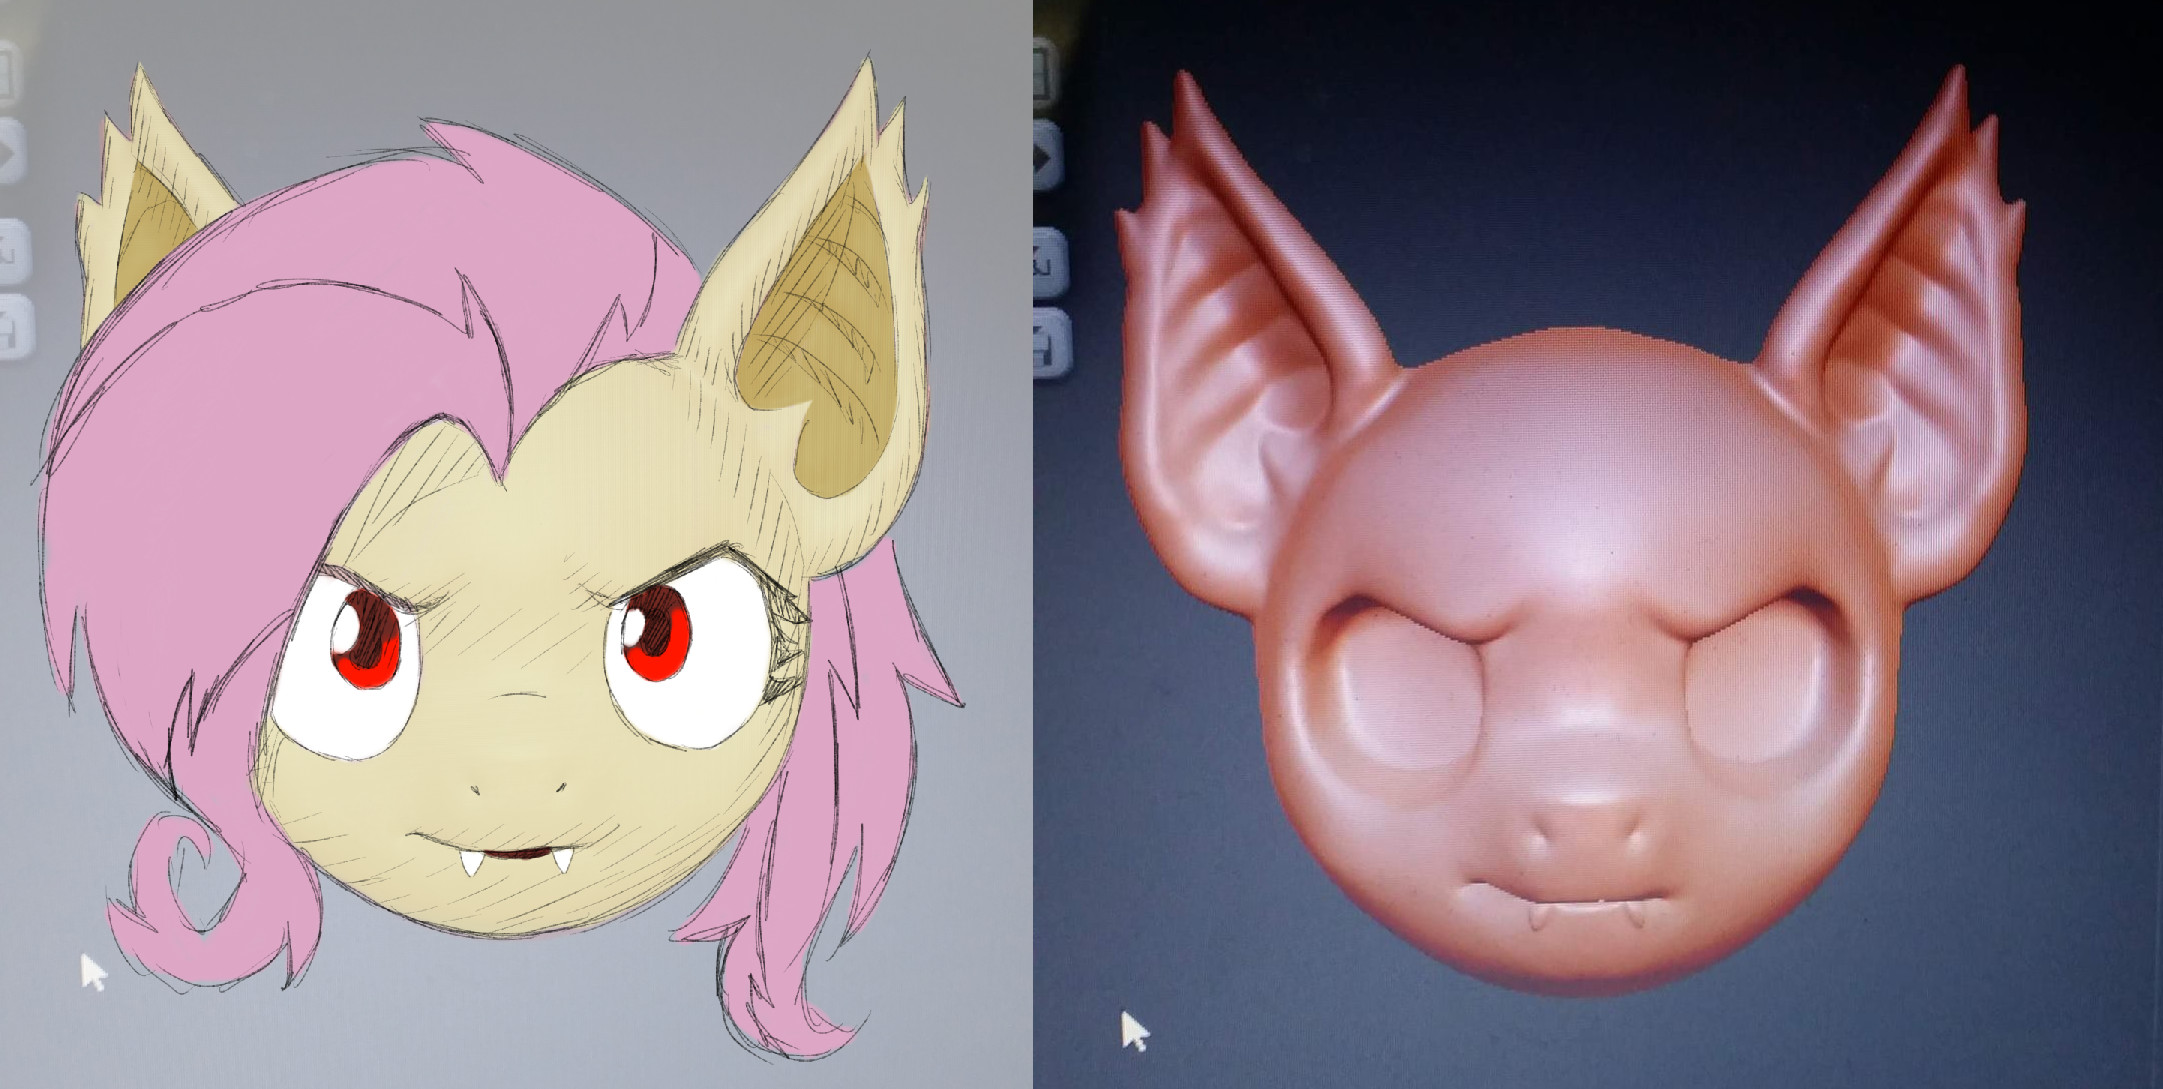
Initial concept art/model – Flora Hill
3d Model bought on Turbosquid
Step Two – get help…
For doing a mask / costume its really helpful to have art reference on where your going. I cant actually do the art part on my own so I always have someone help me with this step.
Since this mask was to be off a 3d print, I also need help with the 3d model for the head.
For Flutterbat, and my new Bramble Bunny (coming soon!) I worked with my good friend Flora Hill.
We went back and forth on the concept art, making a few changes, in facial expression and whatnot till I liked the design.
With the 3d model I was good to actually start the physical part of the build.a>
Note: for the 3d models you have many options, you can make your own. Sites like OpenKig have some 3d models available you can use. You can have someone custom make one. There are also sites like Thingverse and Turbosquid. My Aratako character came from a model I bought off Turbosquid.
Also of note! I pulled the graphics for the eyes and the Cutie marks straight off DeviantArt
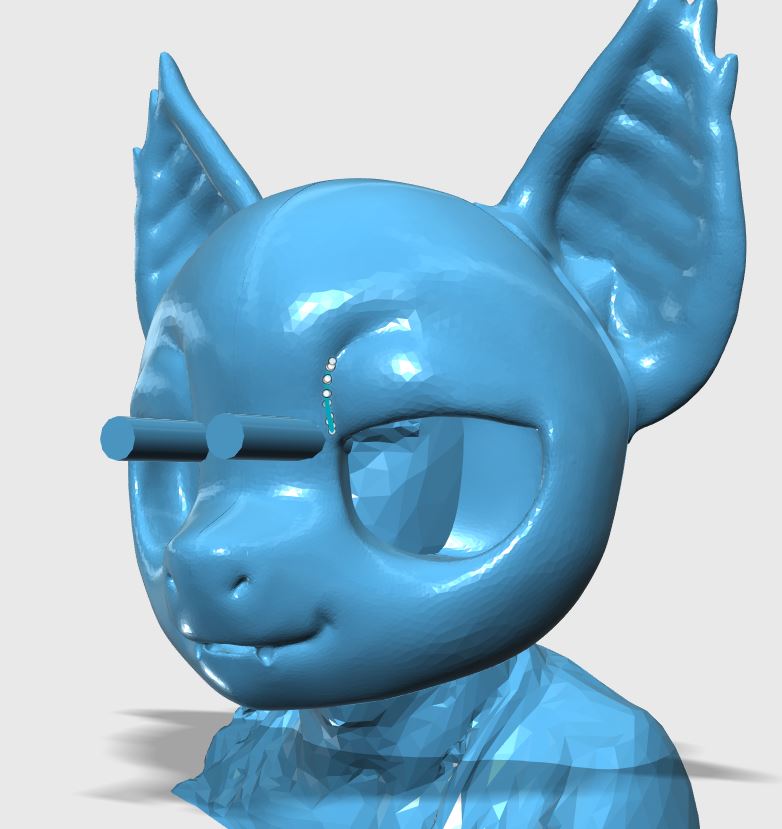
Sight line projection
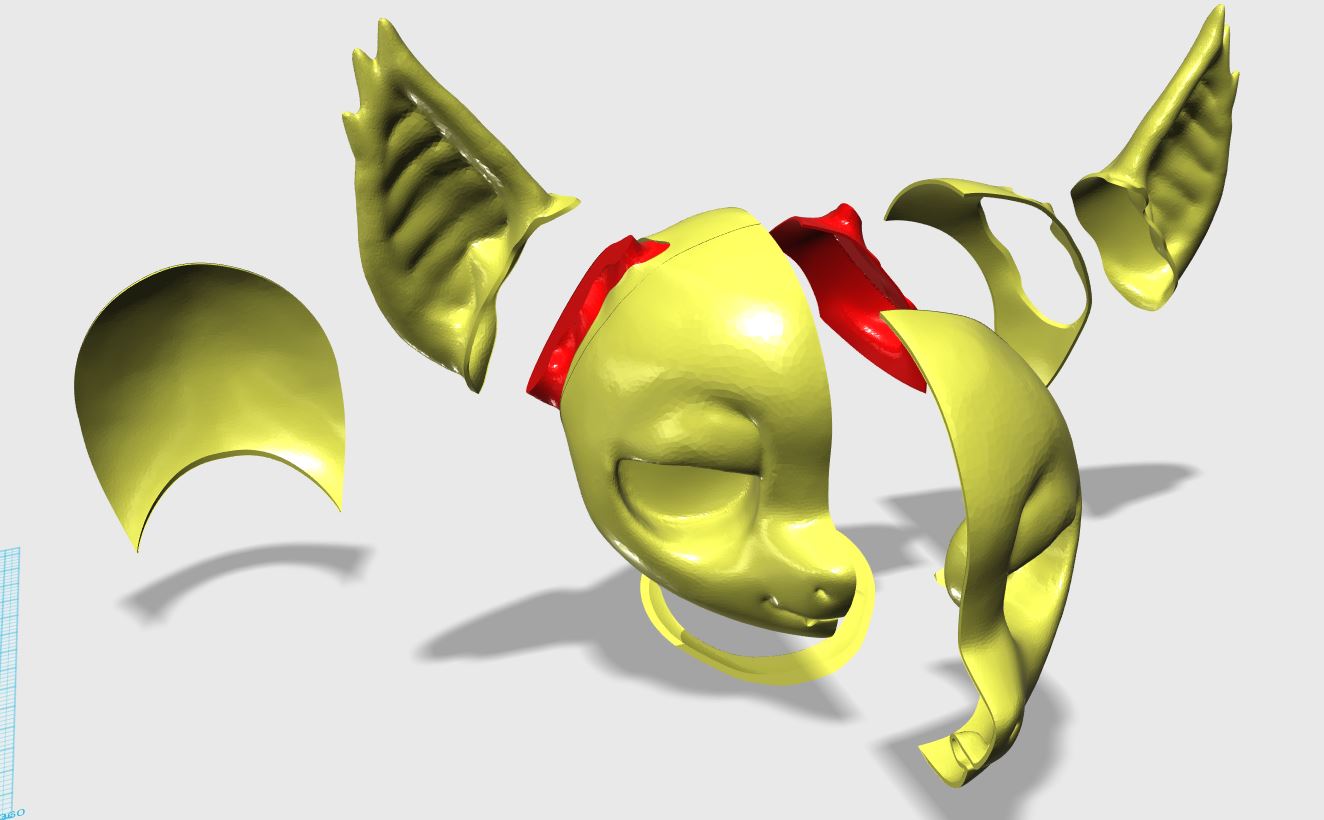
Cutaway after slicing

Figure out cuts to fit printer
Step Three – make the 3d sculpt printable
One might think that with a nice 3d model you’re ready to go to simple hit print and you can print up a mask. Well there are lots of steps you need to do to prep the model to make the sculpture into a wearable mask…
This part takes me some time, maybe 10 to 20 hours, depending on how much the software fights me. Working on largeish models can take be slow, even on a powerful gaming computer.
- scale the model, make it the right size to fit you…
- hollow the model, if you just print a model it comes out solid. You really need to make the model a hollow shell so you can work with it. I use software called Meshmixer from Autodesk for this step, it lets you define a thickness for your shell, as well as optimize and reduce the model, making it easier to edit. It can also stitch multiple models together if you want to add in latches, hinges etc…
- cut the eyes, and other holes (mouth, nose, vision etc…). I often use a scaled 3d scan of myself to size the head pattern against. it lets me see where the eyes will fall on the mask, which helps you see where you need to put the vision cutouts.
Fluttershy’s wide face makes it so the vision falls outside of the eye sockets. To see I cut small vision slits in the eyebrows. I also made the black parts of the eyes mesh which gives me some peripheral vision down, making it easier to not step on people / kids, and makes stairs much easier to navigate.
Tip: Always make the black parts of your eyes mesh even if you can’t see through them. It makes your mask breath better and MUCH cooler inside! - Engineer! You can modify the model in cad to make Make doors, hatches, removeable parts, etc. For Flutterbat I made her ears removable to make it smaller for air travel.
- Figure out a print pattern. most lower end 3d printers can’t print a mask in one piece. You have to figure out where to cut up the mask into pieces so you can print it all out.
I create a block the size of my printers capacity, and overlay that on top of 3d sculpture for a visual reference on what will fit on the printer, it makes it easy to place the cut sheets on the outside of that block, that way you know the cut pieces work on your particular printer.
Tip: Some printers can use all of their printable space, some are slightly smaller or larger, you need to know your printer before you start cutting your model to print!
Of note… the method I use to cut the model is to create a paper thin (.01mm ) sheet and put that flat sheet through the model, like a blade wherever you want the cuts. Then in the CAD software you “subtract” the sheet from the model. What that does is delete the sheet, and more importantly it also deletes from the model wherever the sheet intersected with the model. Leaving a perfect cut! This subtraction method exists in ALL 3d CAD editing packages. (not in 3d sculpting which is a bit different).
You can also use this subtract method to cut holes and things, for example you take a cylinder and subtract it from the bottom of your hollowed head to make the neck hole.

Printing 1/2 of the face
Step Four – print the parts
This can take hours … Flutterbat took over 60 hours to print in 9 separate prints.
Lots of things come into play on this step. the actual plastic you choose (PLA/ABS/PETG)can affect the durability of your mask, as well as how easy it will be to print. Much of this will be affected by the particular printer you are using to do the print. Some printers like some materials more than others.
I print in PLA most of the time if the print has multiple pieces. I sometimes use PETG if I can but I don’t have a lot of success using PETG with huge builds with many parts that need glued together. The edges tend to warp slightly with PETG causing gaps that are a pain to deal with. It can be done but it takes more time but my printer isn’t good at it so I don’t go there. There are whole articles online about the differences in 3d printing filaments, so I am not going to go into that here.
Fluttershy is printed in PLA plastic. PLA is like another cosplay material worbla, both get soft at fairly low temperature. So a mask in PLA would possibly melt/deform if left in a hot place like your car in the summer ! PETG has a might higher melting point, so its less likely to be damaged by heat.
Step Five – Assembly

Sanding the edges !
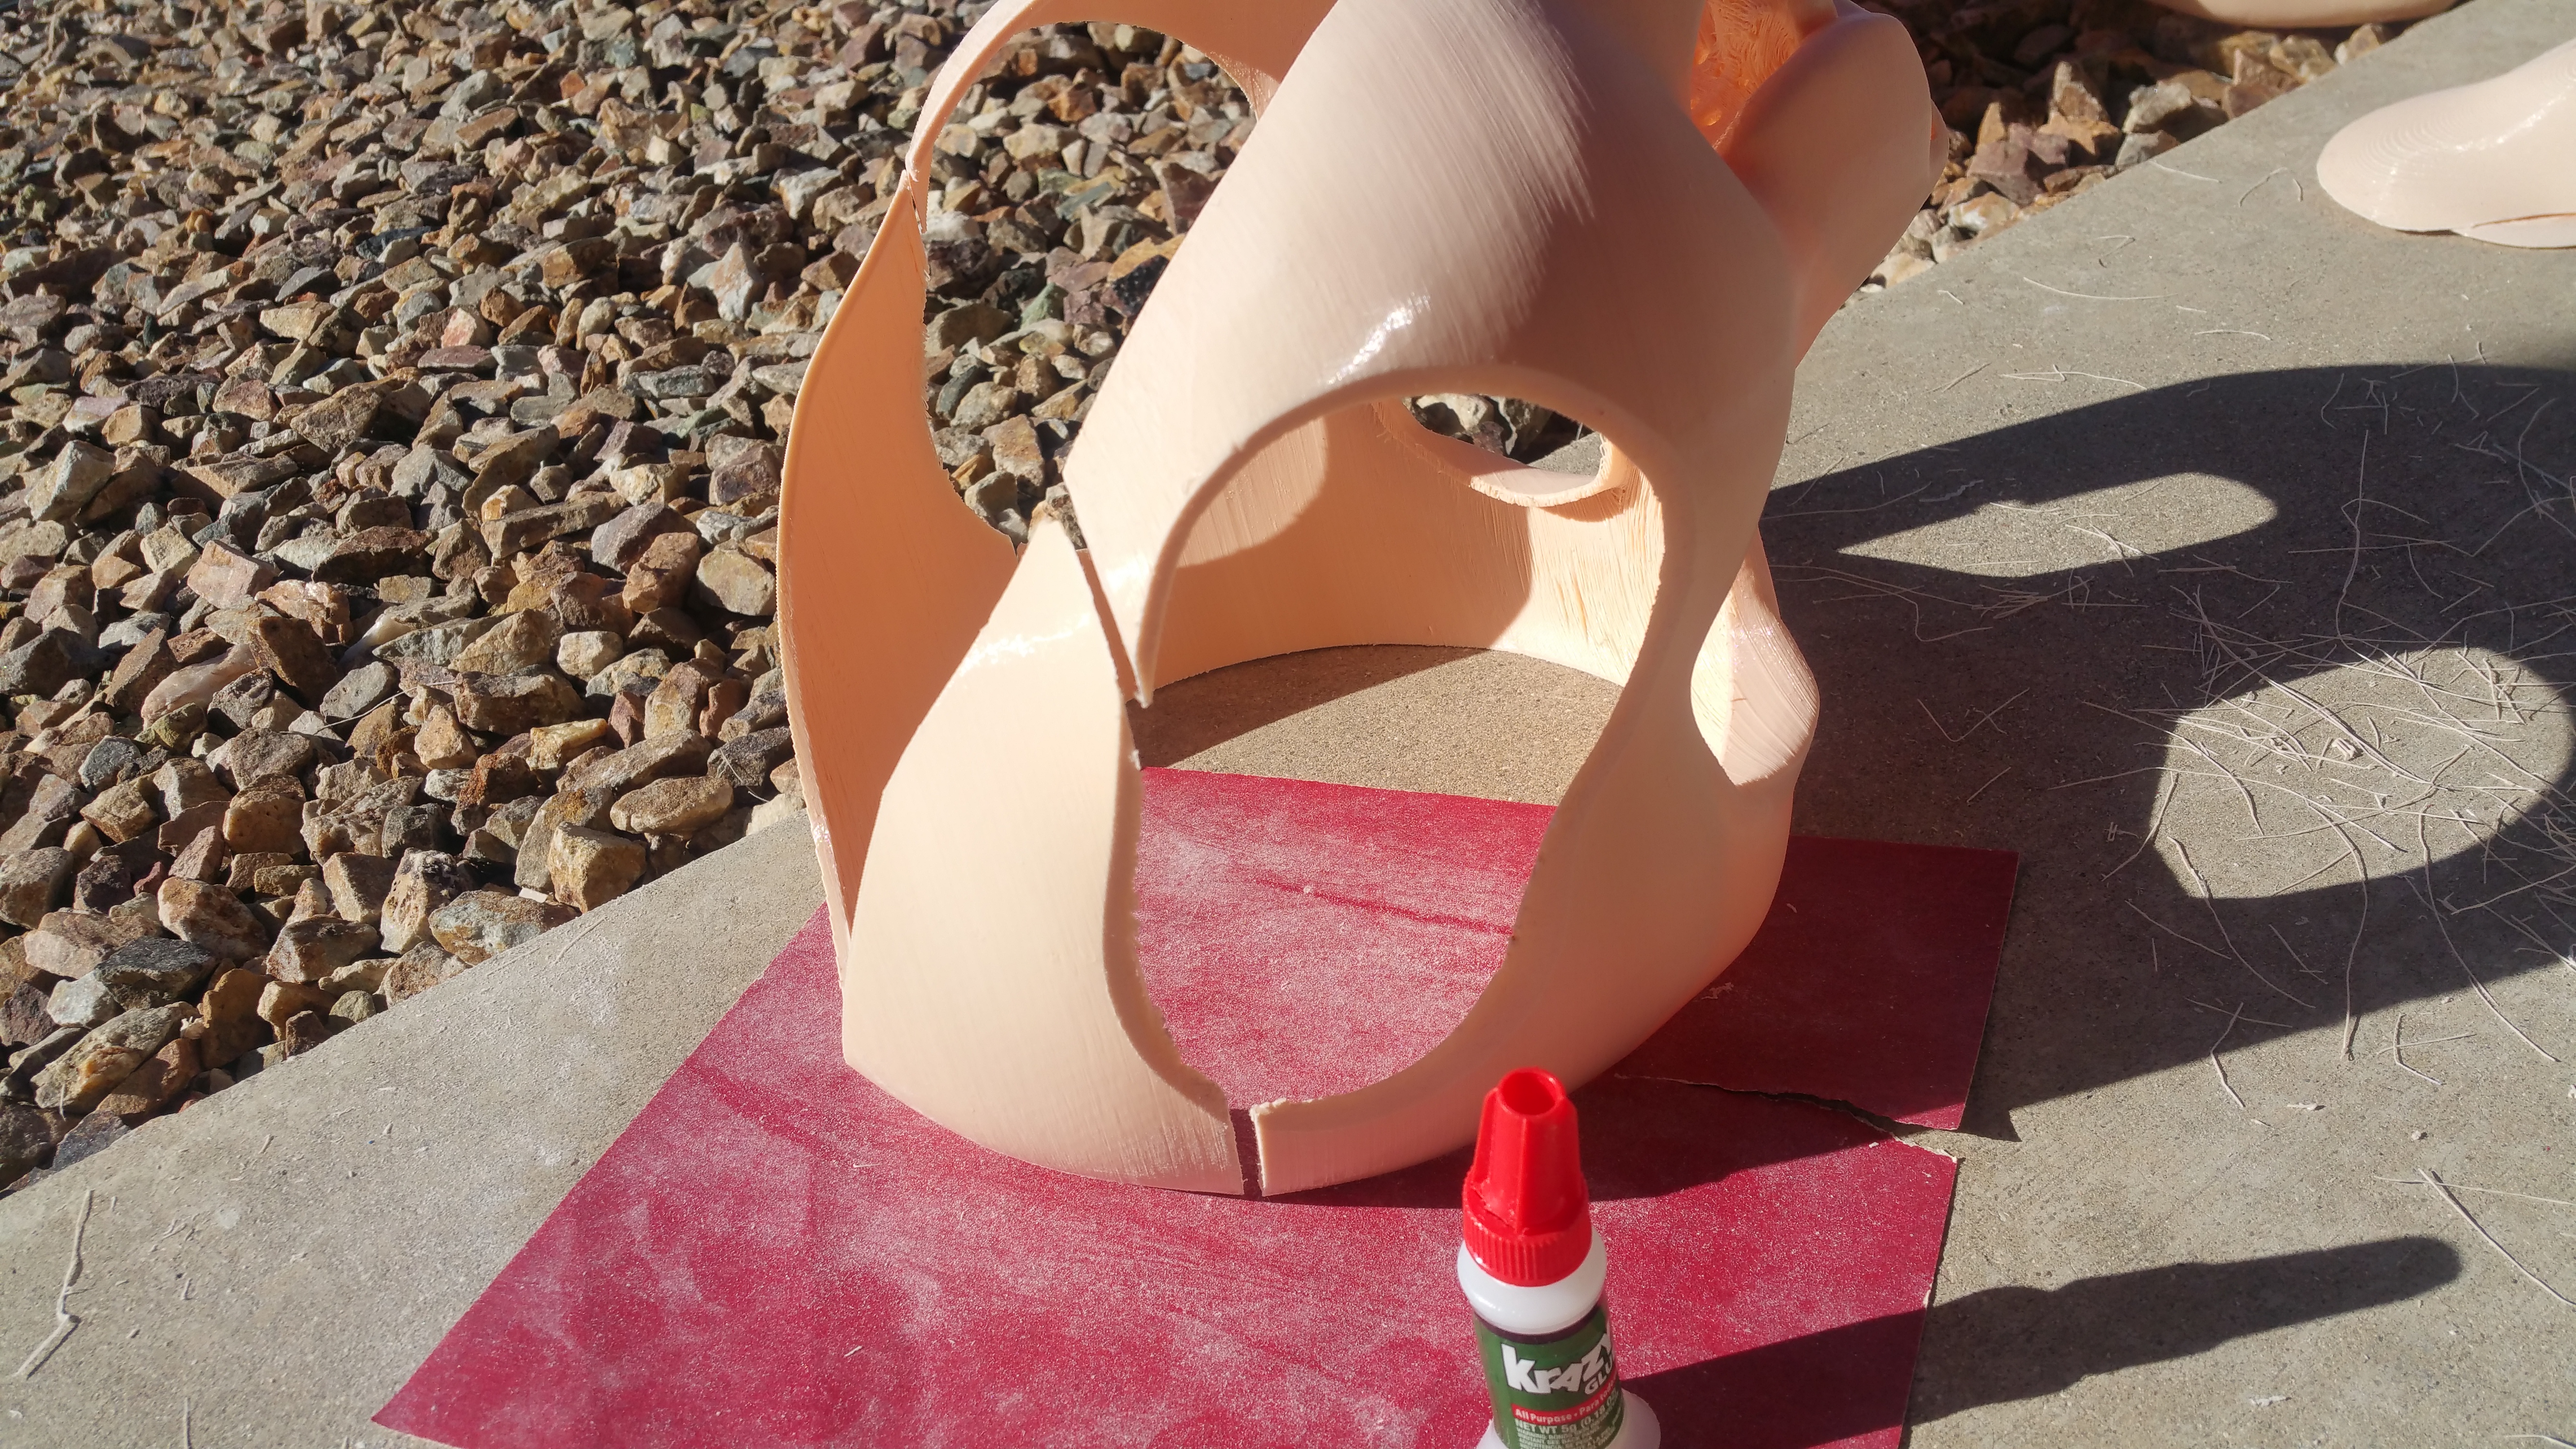
Tacking it together
Ok so now you have a pile of parts. I don’t have pictures of all the Fluttershy bits, so I’ll show pictures from the Bramble Bunny build to illustrate the points here
I normally take and quickly test assemble the pieces with a very few dots of hot glue to make sure it all fits together before I start sanding it for real final assembly. This is a good double check to make sure that you have all your parts, and that they are all in good shape.
Some very minor warping is normal as you print, the test assembly above helps see how much sanding you need to do to get it to go together. …
At this stage I sand all the edges are flat that are going to be glued together. I put sandpaper down on a flat surface and then use that and rub the flat edges of each piece over it until they are nice and flat. Generally, you should be able to put any piece cut edge down on a flat surface and it should sit there perfectly flat and you should not be able to see under it.
Once all are flat you can start the real assembly!
I do this in two stages… First superglue to hold the whole thing together while I epoxy it which permanently holds it together.
When possible, I put two connecting pieces on a flat surface to make the alignment perfect, put superglue on the edges and stick them together. Keep on doing this until you get it all together!
Note some gaps are not terrible. You can fill these a variety of ways. we will get to that later…
Mask after initial epoxy
Now it’s all assembled with superglue I check it over to see if I like its alignment everywhere. It’s easy at this point to pull the edges apart and try again if needed.
To permanently glue it together take two-part epoxy, mix it up and pour it in lines over the seams on the inside of the mask. The goal is to get a nice wide epoxy puddle over each seam, I like it to be 3/4 to 1inch wide… sometimes I also do extra lines of the epoxy across the mask on the inside to provide extra strength and support. I don’t cover the entire inside surface just along the seams and occasionally a few extra lines. For most small gaps of a few millimeters you can squish the epoxy through those gaps. if some gets on the outside its ok, it sands off and provides a smooth surface.
The gorilla glue is pretty fluid and takes some time to set. I tend to do one or two seems at a time, I pour it on a seam and then take the mask in my hands and turn it to get it to run and flow where I want. Then prop it up to hold it in the position while it sets. Checking on it about every 5 minutes and turning it to get it to go nice and even everywhere I intend. After about 15 or 20 min it is usually tacky enough to stay where I intend.
I always use Gorilla Glue epoxy, but any should work. Tip: Experiment on some small pieces to see how the epoxy sticks, flexes, and if you can sand it off…
test, test, test !
pony mask / cap detail
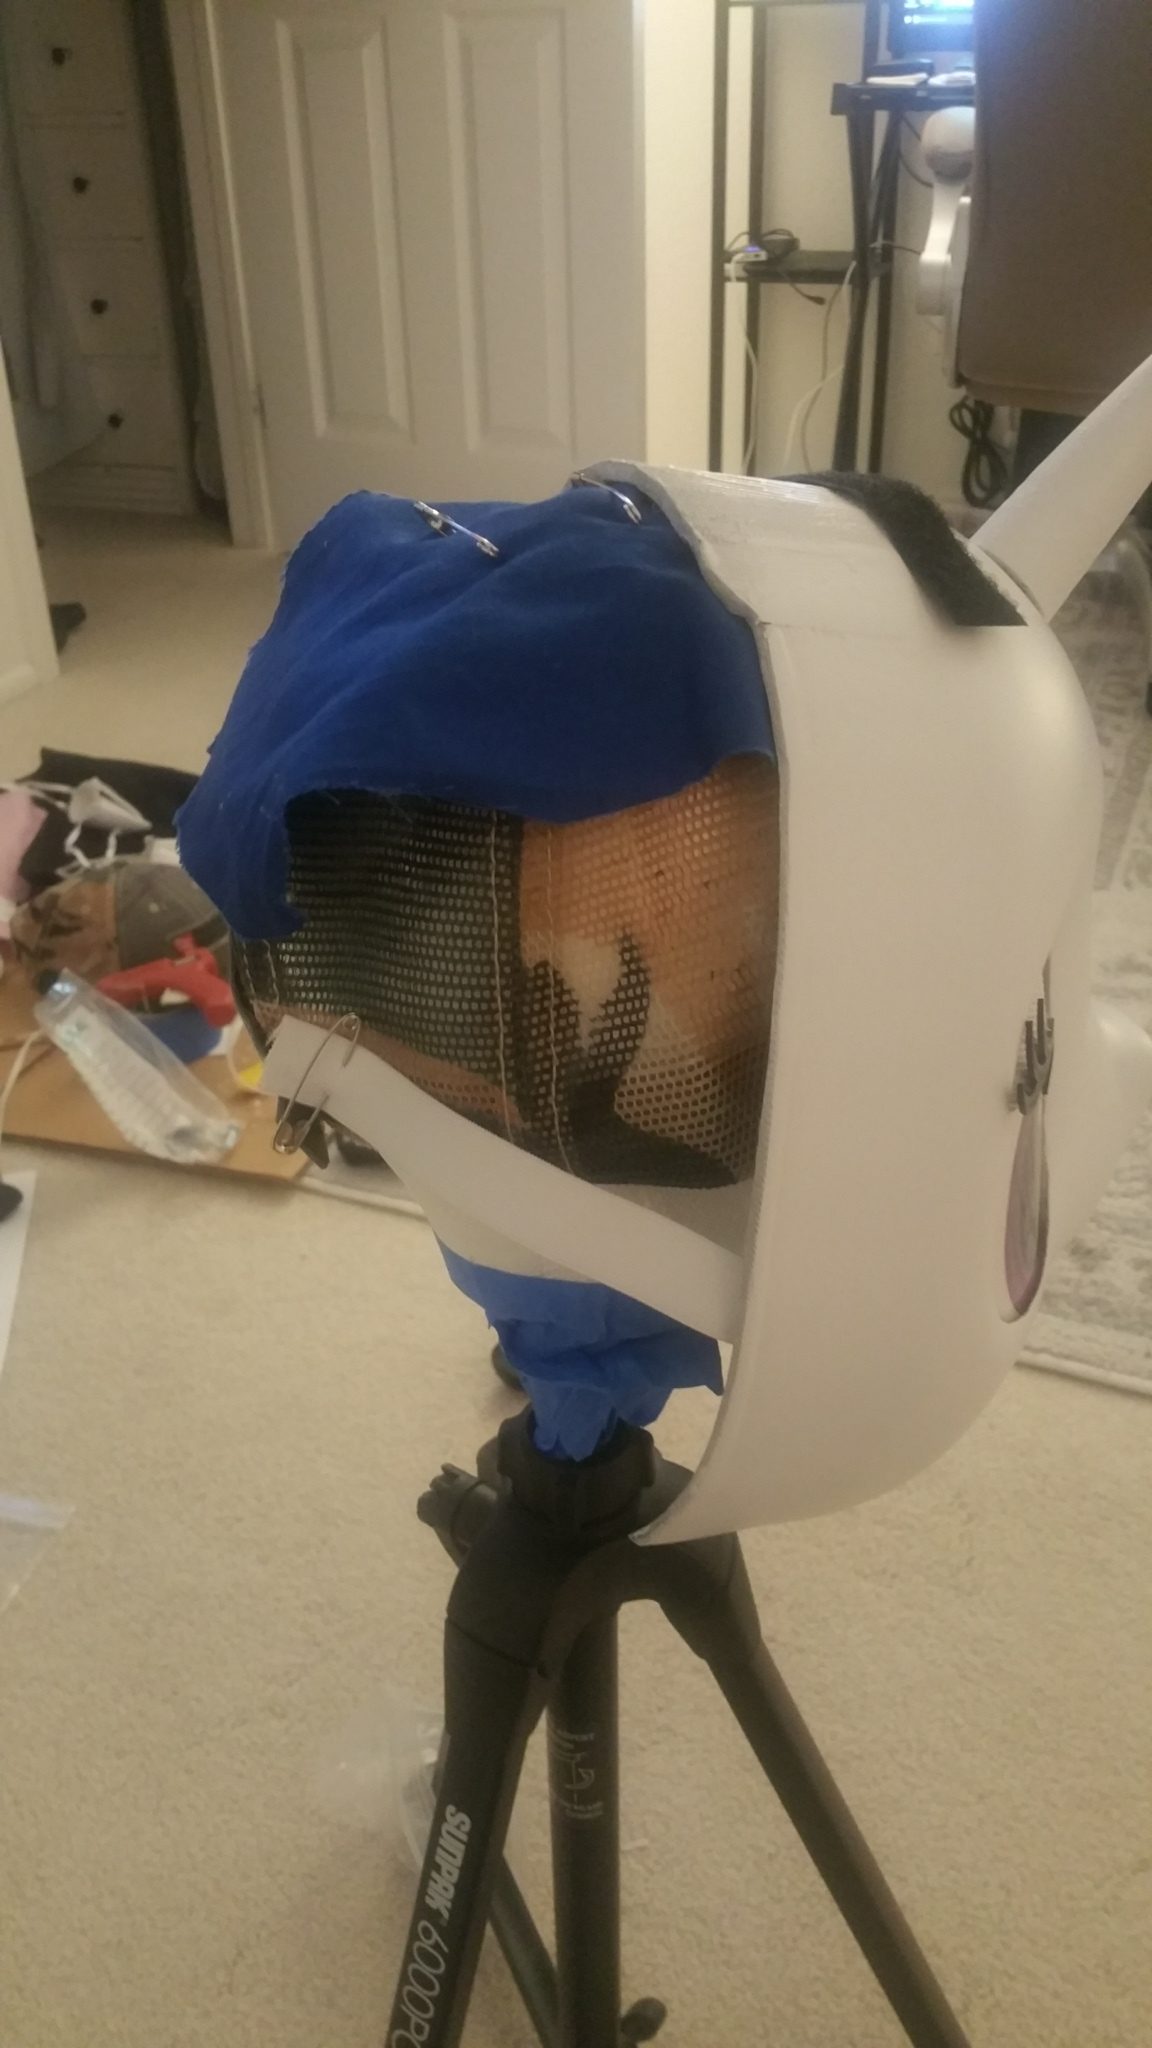
Step Six – Interior mounts / testing
You need to hold it on your head somehow. I use baseball caps, inside all my masks is a baseball cap from tractor supply with the brim cut off lol … (I am planning better mounts for a future masks but this is what I do right now)
I take e6000 glue and put a big dab (1.5 inch circle) onto the center of the top of the inside of mask, right above the center point of your head in the mask. I take a 1.5 inch wide by 1.5 foot long strip of cotton duck material (any material that is tough with NO STRETCH) and glue put glue it in the middle so it runs long way front to back with half of the strip towards the front and half of the strip goes towards the back.
Let it cure for a day or two, then use the material strip and safety pin to the hat on the front and back of the hat so that the mask cannot shift forward or backwards as you wear it… try it on and see if it aligns like you want, keep adjusting it until it sits where you want then trim off the extra material from the strip. I always leave a few inches of extra so its adjustable later if I want. You can put foam pads above the hat to raise the mask to help align the mask if needed.
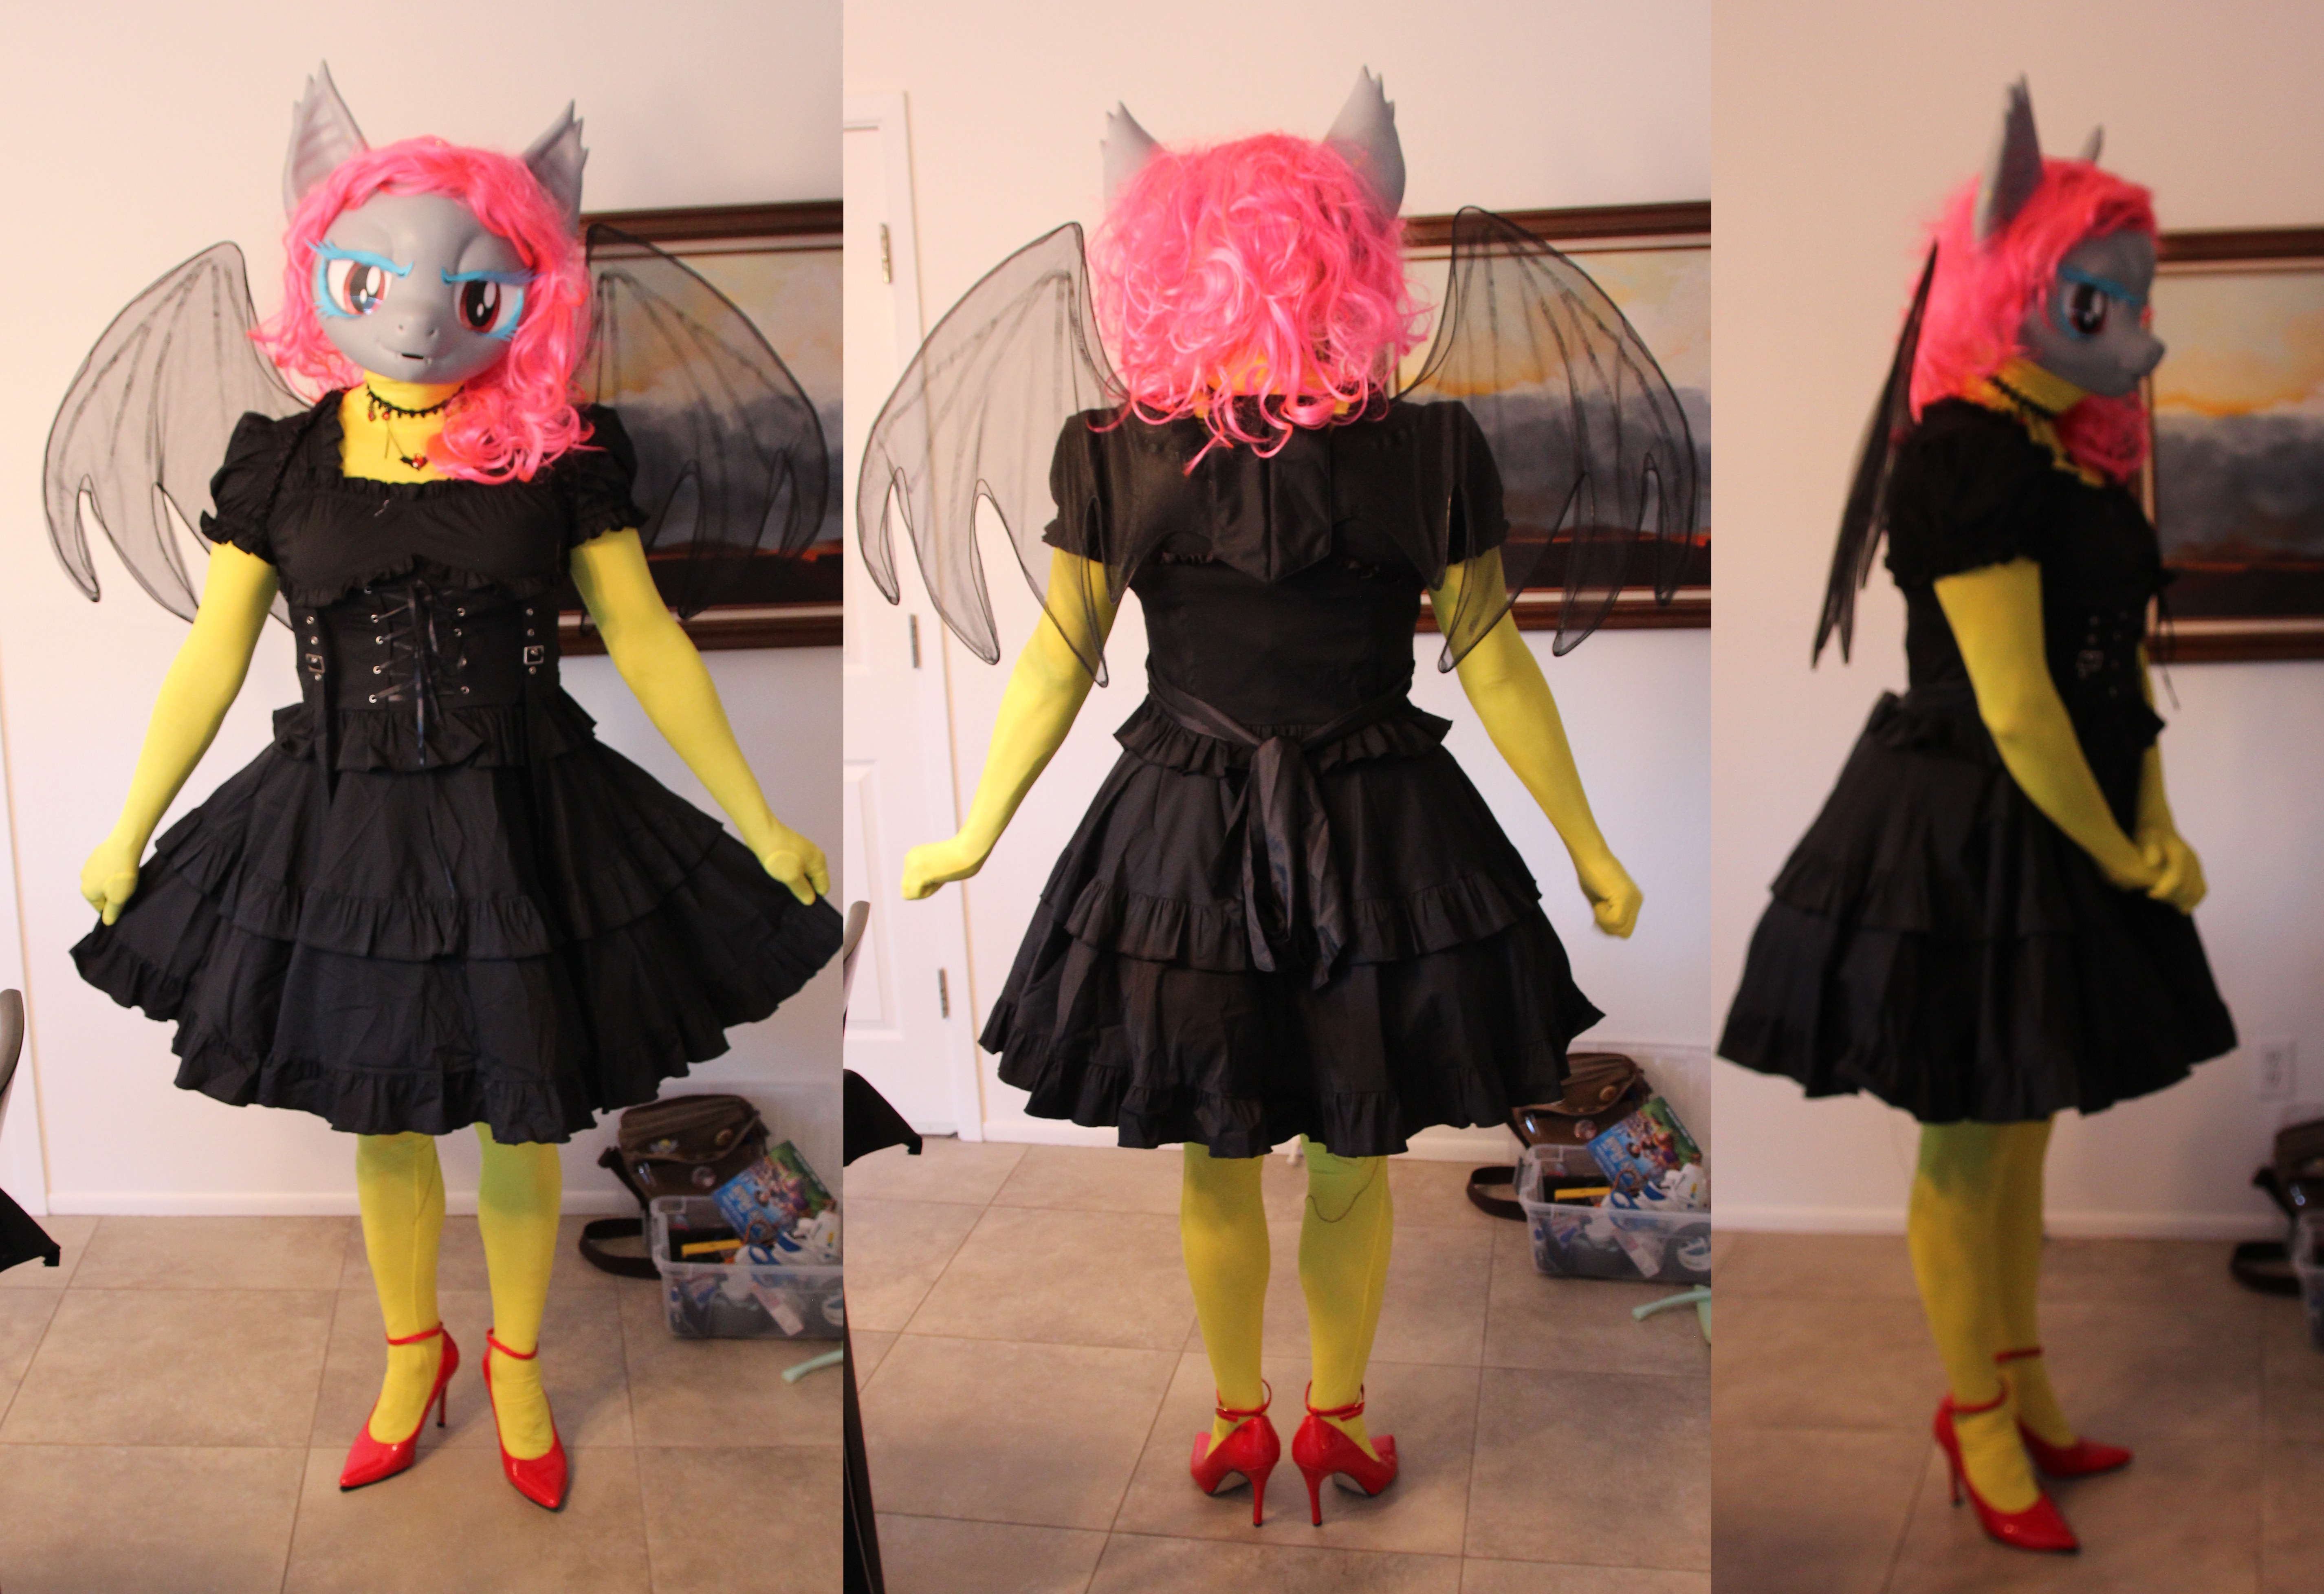
Now test it out, make sure you can see out, make sure it fits ok etc. Have someone take some pictures to make sure you are happy with how it looks. If you have any of the clothing try it all out as well.
If you need to fix anything on the mask (vision etc, do it now, before things are painted.)
Don’t sew it together at this point. Once you have tested it mark where you pined it toghtgher and take the hat back off. Pin the strapping up out of the way and cover it with blue painters tape.
Step Seven – Smoothing / Surface prep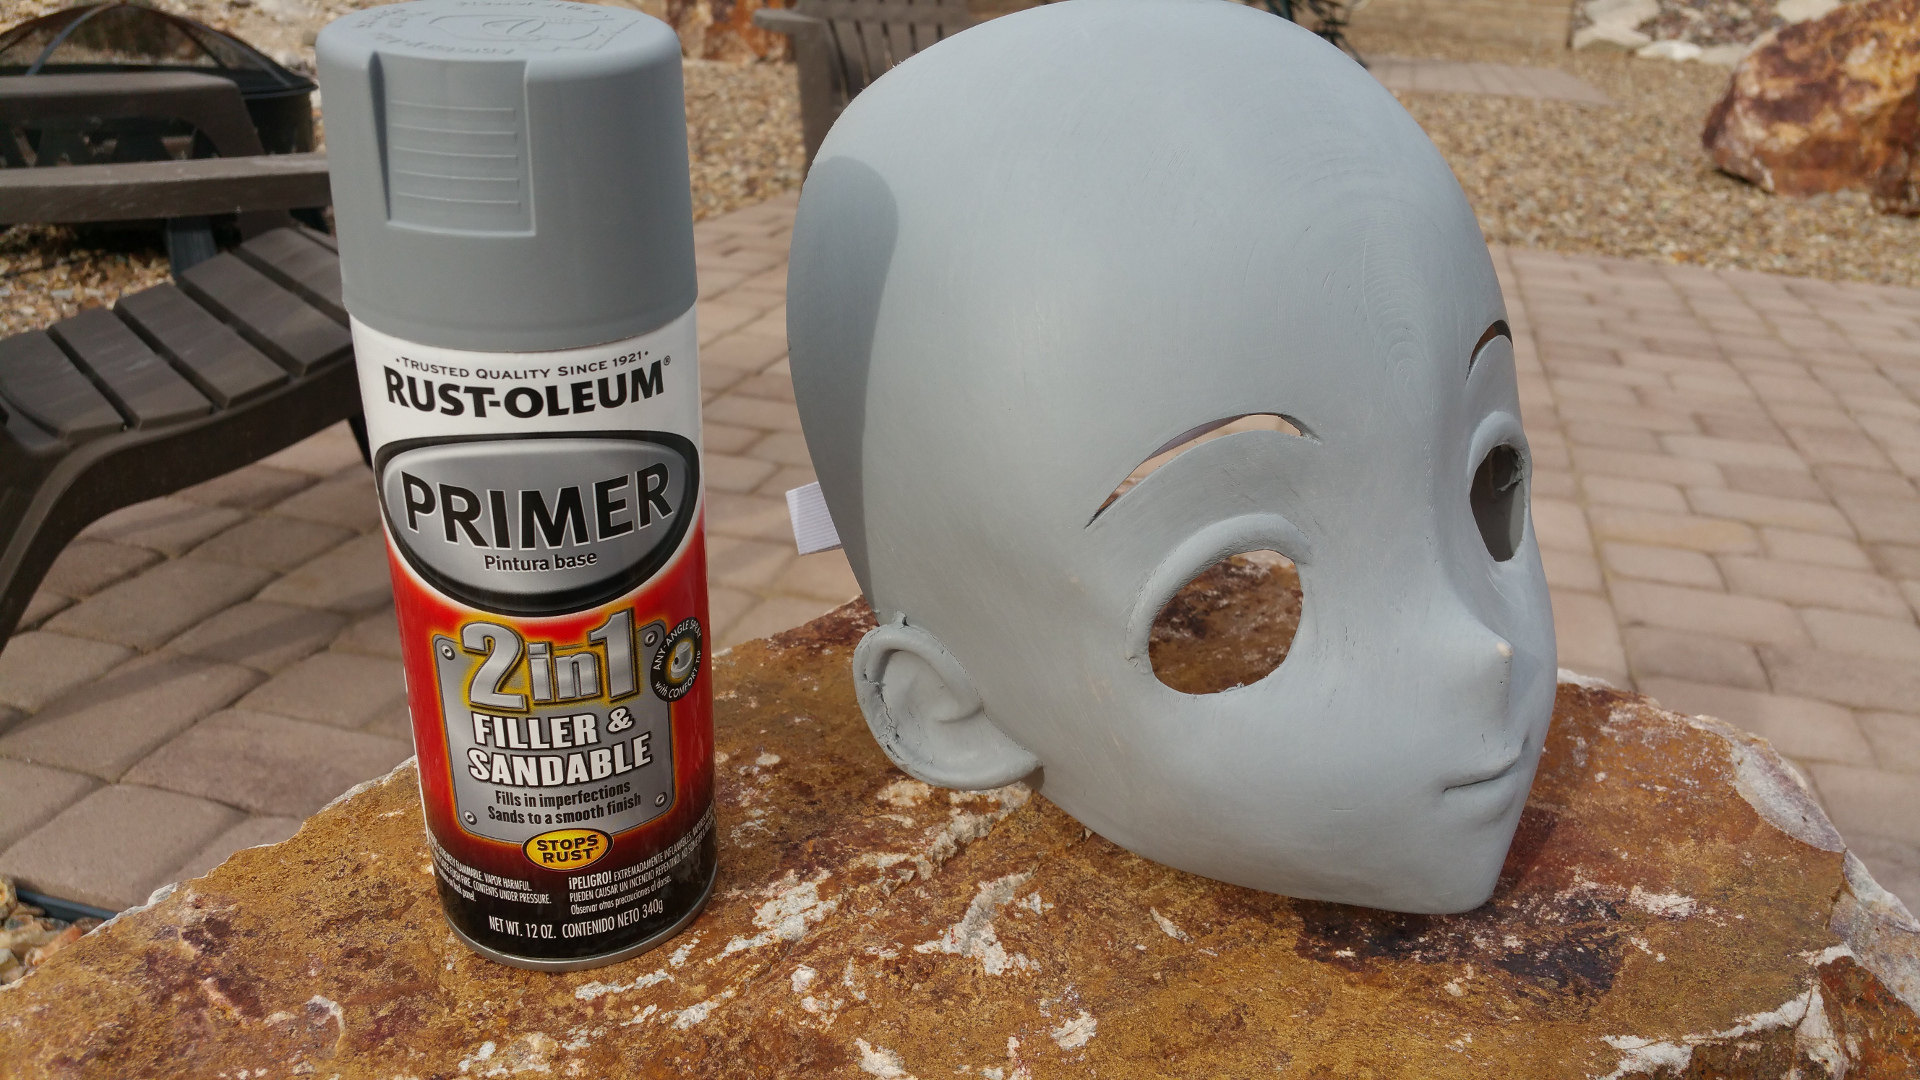
3d printers don’t really do a very smooth surface. it’s a bunch of tiny stair steps, so you have to do something to smooth out the surface if you intend to paint it. If you’re going to cover it with material / fur, you don’t have to get it perfect, but you do have to even out any bumps in the seams.
Fluttershy was painted so it involved a quite a bit of sanding and prepping to get the surface nice and smooth…
I use a plain old Black and Decker “mouse sander” to do the outside surface sanding of the 3d print. this is to get all the major bumps out, but most of the time the print will never ever be totally smooth enough to paint doing it this way, this is good enough for furring or covering in material (Luna/Cheerilee/Bramble Bunny).
Next, we must put something on the surface to make it perfectly smooth. Flora likes to use Bondo (like on a car), I like to use spray on filler primer from Rustoleum(see Picture).
This is a VERY time consuming process but actually REALLY EASY. Simply spray on a layer of the primer, you don’t have to worry about runs or anything, just spray the sucker all over.
Then let it dry / cure. Here in Arizona it is really dry and warm, so I only need to wait about 24-48 hours, in wetter climates you may need to give it more time.
Note, if you don’t let things cure properly when you sand it, it won’t make dust, it will be sticky and be like paste on the sandpaper. Curing is super-duper important!
Once its dry you take some fine grit sandpaper (200ish) and sand it nice and smooth.
This first layer when you sand it you will likely sand down to the print in several spots, get it nice and smooth. Now you have a mask that is covered with fine dust, which is no good. Wash it… I just spray it off with a garden hose and then dry it with a paper towel, then let it airdry for several hours, sometimes overnight.
Then repeat the process. Spray on the filler primer, cure it, sand it, clean it, repeat… you will need to go 3 or 4 more times, each time you get another nice layer of primer/filler and it makes the mask stronger and smoother.
Once you like the way it looks, let it cure for several days! It is absolutely mission critical to make sure it is all the way cured before you put real paint on it otherwise the paint will bubble or peal. It will also show if there are imperfections (cracks) in the filler once it cures for several days.
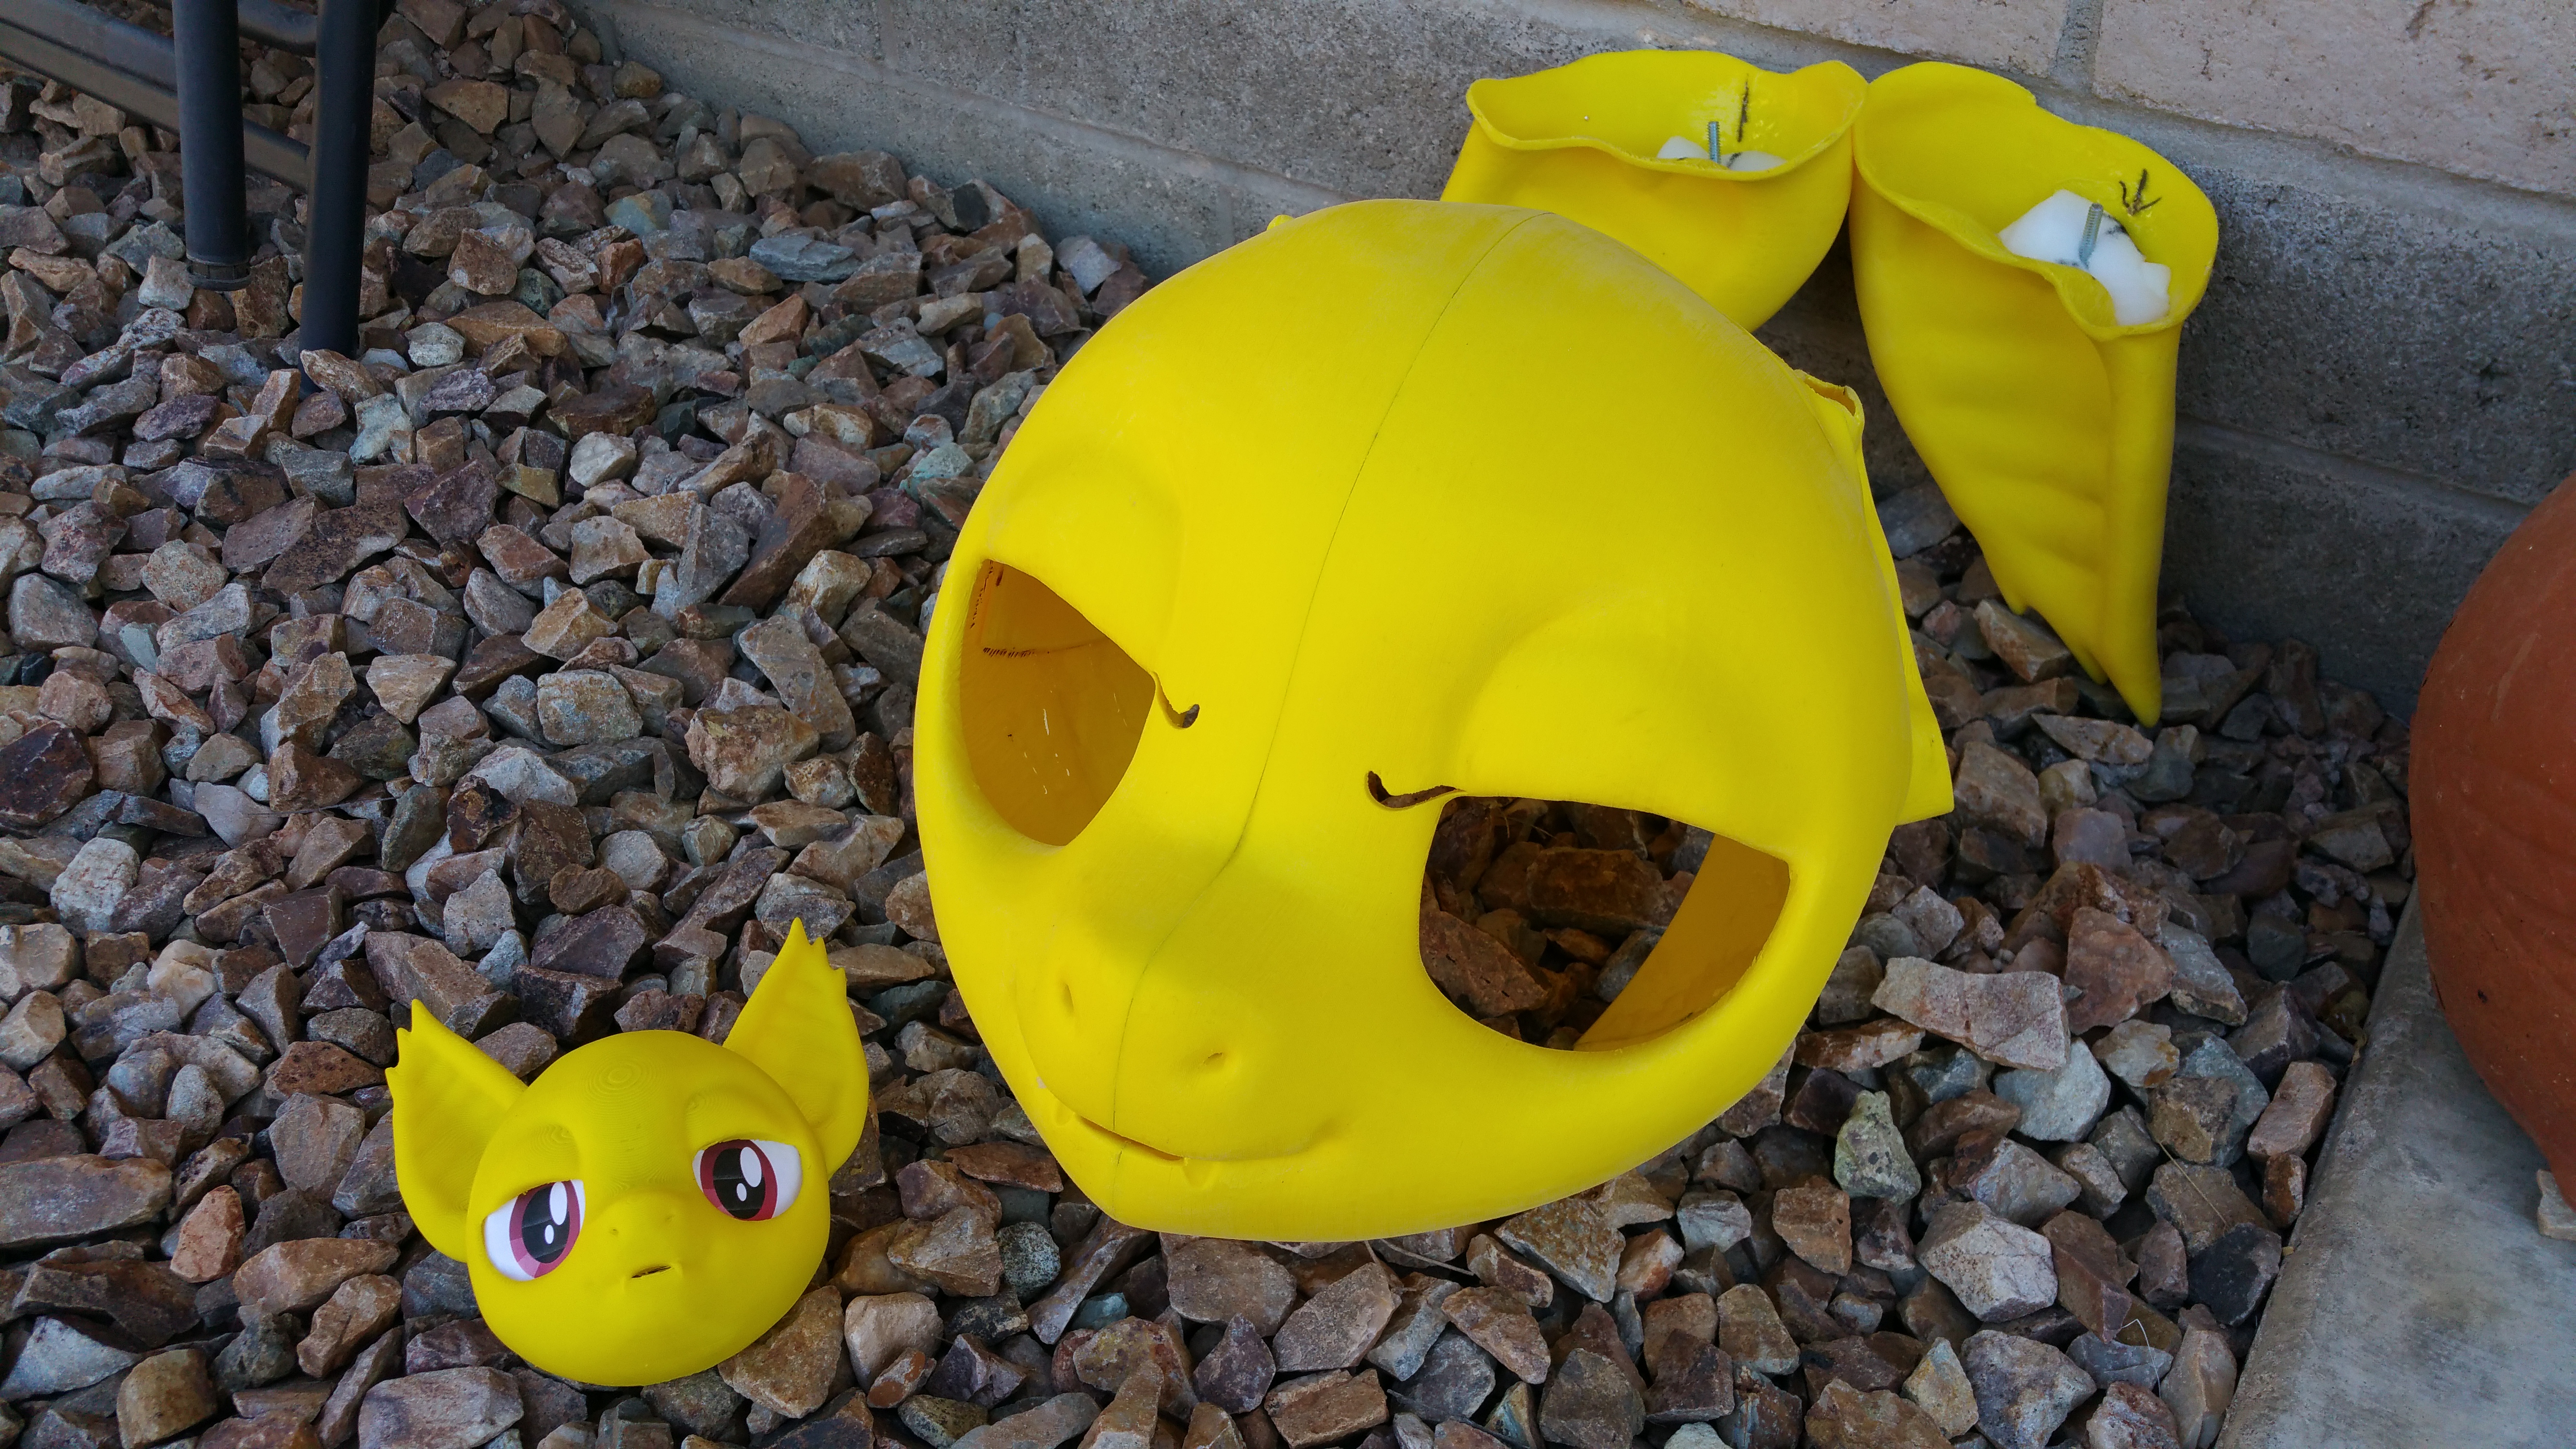
Step Eight – Painting
I hate painting, I am awful at it … I really haven’t figured it out well so no sage advice here other than, these few tidbits below.
now you may have noticed that my Fluttershy (and other ponies) are a bit glossy, their skin and faces are semi-gloss. this isn’t a mistake. As My Little Pony is line of Plastic Toys I wanted them to look like a shiny plastic toy. For your project be mindful of the type of paint you get so it matches your overall look.
I start by painting any inside surfaces that need it, like painting the inside of the mouth black. Anything that might be a pain to do after the outside is done.
Paint in several layers, cure each layer as long as needed before you paint the next. This can mean a few days between layers, depending on the weather conditions type of paint etc. If you mess up, dont worry about it, let it cure and get nice and hard, then sand it down with super fine sandpaper 500-1000 grit and then try again.
Note, if you don’t let things cure properly your paint wont stick well, it may bubble, or give you other grief to cause it to not be nice and smooth.
People with more talent than I will use airbrushes at this point to do highlights on the cheeks etc. I am not there yet… lol. My masks are solid colors at this point.
Have a small celebration ! The most time consuming stuff is done at this point. Now you need to do all small fiddly bits to finish it off.
Step Nine – Eyes
I do laser printed eyes, Flutterbats eyes came straight off deviantart (thanks to *name/link here*)
I print them up, laminate them (like a con badge) then use an exacto knife to cut out the black bits and put mesh in for vision and/or ventilation. Then I hot glue the eyes to the inside of the mask. Note: eyes made this way don’t last forever. maybe only 2-3 years. Moisture gets into the laminate and causes them to come apart eventually, that’s why I only hot glue them in, so I can replace them over time as needed. There is room for improvement with this … someday lol…
For Eyelashes, do them up as 3d prints, or in foam, or paint them straight onto the mask. Whatever works for you. I did 3d printed eyelashes. If you look closely at my test wearing in step six, I have paper eyelashes, I used those as templates for making the 3d model.
Step Ten – Interior mounts
Ok back to the head mounts!
Lets attach you baseball cap back in there, just like we did earlier, with safety pins. Try it on and make sure it fits, then you can sew it onto the hat at this point if you want, I never do, the pins hold fine so I have never bothered. Cosplay is Safety pins and hot glue, right? 🙂
Then cut up some small foam blocks, I take small foam blocks and take dabs of hot glue to put them onto the interior for comfort and to keep your head from impacting the hard shell.
Step Eleven – Hair
Wig treatments for cosplay are a subject unto themselves. I don’t do anything extraordinary here, I don’t do any styling, I just cut apart several wigs and lay them on top to cover everything, so it looks passable, then tie the separate wig pieces together with 5 to 10 knots so it doesn’t fall off.
Specific things I do on mine to keep things in place. I hot glue a strip of velcro near the front of the hairline onto the top of the mask. I glue the other half of the velcro to the inside of the wig. that keeps the front edge of the mask firmly in place.
On most of my masks the pony ears pierce through the hair and the hat to hold the hair in at two other points… which is all I do. You could easily also do some velcro strips elsewhere near the back to hold things where you want.
On Flutterbat I tried something new. I glued down solid core copper wires to the head to point up and provide guides to hold the hair out of her face on the sides. I also put some guides on top to see if it would keep the wig from sliding around.
Pros, it worked, the hair stayed all day where I put it! Cons, if someone pats my head there are hard sharp wires up there. It is 6ft or so to the top of my head so that doesn’t happen often with me…
That’s it for the build!
Other miscellaneous stuff…
- At some point start buying all the items that need bought. Normally I start that early on around step 3 or 4, but it’s not an exact science.small scale testing
Keep in mind if you are having items custom made, like your Zentai or your Dress, they take 30 to 45 days to get to you… - print small test versions of the mask before you go full scale. This will let you hold something and look at it from all angels and see if you like it. It can be a big timesaver since it takes so long to print and glue together the full sized mask.
- try stuff on as often as you can in the process… testing the wearability of the is important.
- take photos of the build at various angles as often as you can. Look at those photos and evaluate it. Think about how the costume will look and work while your wearing it. Doing this can help you catch errors and or make improvements !
Bill of Materials / Equipment
- Printer $500 -Robo3d R1 + (https://robo3d.com/)
- Printer Filament $100 – 4 spools 2 yellow, 1 pink, 1black
- Dress: $85 – PJ495 LOLITA PUNK COSPLAY GOTHIC Tiered Layered COTTON DRESS short sleeves
Ebay store (https://www.ebay.com/str/angelsecretbranch) - Zentai $46 – Zentai zone, Unicolor Yellow Lycra Unisex Zentai Suit
- Shoes $28 (ebay store)
- Fishnets 2x $18
- Necklace $9
- Wings $21 (Amazon)
- Wigs 3x (Amazon)